HTML
Structure
“What does it mean?”
.htmlCSS
Presentation
“How does it look?”
.cssJavaScript
Behavior
“What does it do?”
.jsForked and updated by
Abraham Velazquez (
@lunaroja)
Original content by
Lea Verou (
@LeaVerou)
“What does it mean?”
.html“How does it look?”
.css“What does it do?”
.js
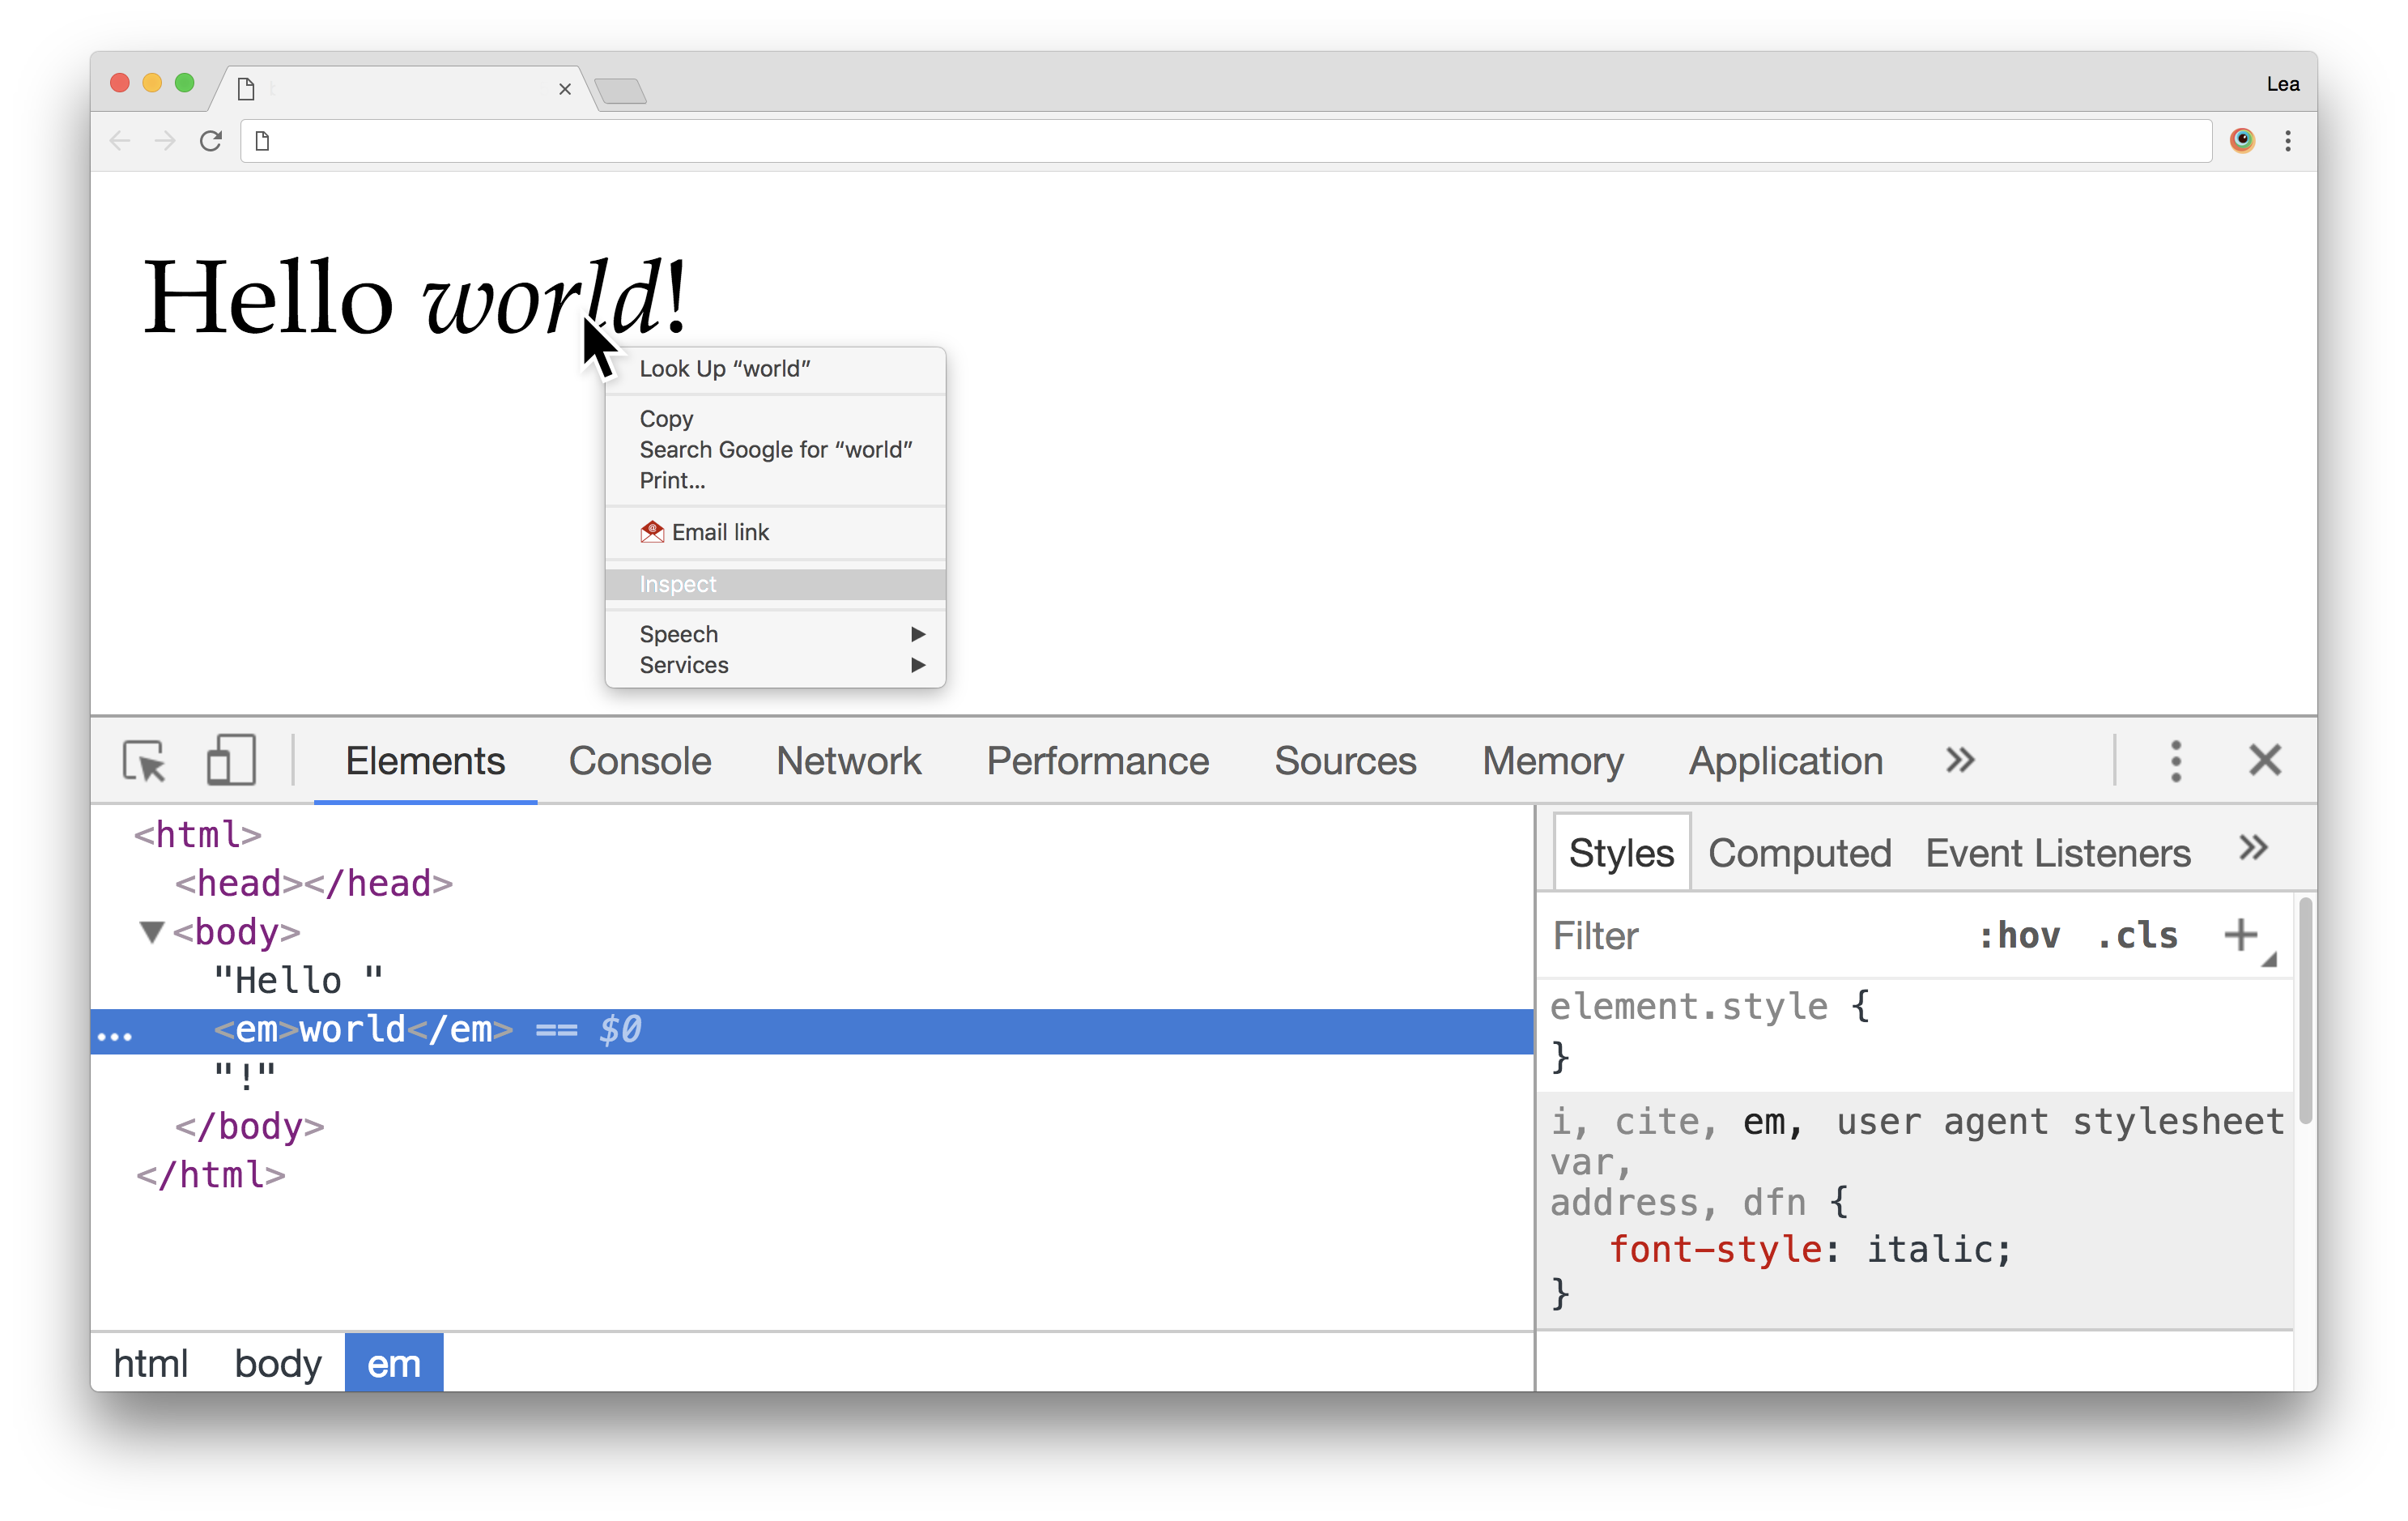
Hello <em>world</em>!
Open page in new tab
Hello
<a href="http://ft.com/world">world
</a>
Open page in new tab
<html>,
<head>, and
<body> elements, the browser will do it for us.Document
: This is the root node, and does not correspond to any HTML element.HTMLElement
: Every HTML element, such as
html,
body, or
em is of this type. Usually, they merely inherit from
HTMLElement
, and are an instance of a more specific type such as
HTMLHtmlElement
,
HTMLBodyElement
and so on.Text
: Text nodes, such as
"Hello ",
"world", and
"!" in our example. These never contain any other element, they are always leaves.
Comment
: HTML comments (
<!-- like this -->) are represented by objects of this type.
			<!DOCTYPE html>
			<html lang="en">
			<head>
				<meta charset="UTF-8">
				<title>My first page!</title>
			</head>
			<body>
				Page Content goes here!
			</body>
			</html>
Open page in new tab
Paragraph
<h1> only once per documenta elements let you link to other websites or even places in the current page.href attribute contains the
link target, which is an absolute or relative (to the current page) URLid attribute near that place. Then, you can just add
#id to the URL.
#yourId as the URL.<ul>), ordered lists (
<ol>), and definition lists (
<dl>) for key-value pairs
img elements are for images,
video for videos and
audio for sound files.
<input> element can generate a wide variety of form controls, differentiated by the
type attribute. If no
type attribute is present,
type="text" is assumed.text,
url,
email,
tel etc):
placeholder attribute shows placeholder text when the field is empty. This is available on
<textarea> too.pattern attribute allows you to restrict input. This does not currently work on
<textarea>s, but there are efforts to make it so.number,
range,
date,
time etc), the
min and
max attributes allow you to restrict the range of input.
number and
range inputs, you can use the
step attribute to control the increment (1 by default).
name attribute.checked attribute
<label> elements are very useful for all form controls, but especially checkboxes and radios as they increase the target area!<select> menus are ideal<select> menus becomes longer than typing the first few characters. In those cases, use
<input> with
<datalist for autocomplete)<button> element creates buttons.<form> elements.action attribute of
<form> elements controls which file will receive the submission. By default it's the current file.name attribute.
			h1 {
				color: white;
				background: black;
			}
h1 headings.color which sets the text color, and
background which sets the background.
			<!DOCTYPE html>
			<html>
			<head>
				<link rel="stylesheet" href="style.css">
				<style>
					h1 {
						color: white;
						background: black;
					}
				</style>
			</head>
			<body>
				<h1>Title</h1>
			</body>
			</html>
3 ways to apply CSS to your page:
link element. This is the recommended way.style elementstyle attributelink and
style elements are only supposed to go in the
head.a.docs:hover matches an
<a> element with the class
docs that is currently being hovered.
			<!DOCTYPE html>
			<html>
			<head>
				<link rel="stylesheet" href="style.css">
				<style>
					.headline {
						color: white;
						background: black;
					}
				</style>
			</head>
			<body>
				<h1 class="headline">Title</h1>
			</body>
			</html>
3 ways to apply CSS to your page:
link element. This is the recommended way.style elementstyle attributelink and
style elements are only supposed to go in the
head.One morning, when Gregor Samsa woke from troubled dreams, he found himself transformed in his bed into a horrible vermin.
He lay on his armour-like back, and if he lifted his head a little he could see his brown belly, slightly domed and divided by arches into stiff sections.
The bedding was hardly able to cover it and seemed ready to slide off any moment.
His many legs, pitifully thin compared with the size of the rest of him, waved about helplessly as he looked. "What's happened to me? " he thought. It wasn't a dream.
font-family: Sets the font, in order of preference. Because on the Web you don’t exactly know which fonts the user has installed,
you provide a list of fonts with a generic fallback at the end.
color: Sets the text color (which is also the default color for several other effects, such as borders and shadows)hyphens: Enables hyphenationtext-decoration: Sets or (in this case) cancels text underline/overline.wee wee weeall the way home
inherit to inherit from a non-inherited property and the value
initial to reset an inherited property.darkgray is lighter than
gray!)hsl(60, 100%, 50%) and
hsl(240, 100%, 50%) have the same HSL lightness, but are they equally light?)rgba() and
hsla() accept a 4th parameter for alpha (i.e. transparency.)background-image property sets the background to the specified image(s).url function, or generate them via the several gradient functions:
linear-gradient
repeating-linear-gradient
radial-gradient
repeating-radial-gradient
background-color
background-repeat
background-size
background-position
background-clip
background-origin
background-attachment
background property to specify all these at once. Because
background is a property that is defined in terms of other sub-properties, we say it’s a
shorthand
(and its properties are
longhands).
background and all its longhands (except
background-color) accept
multiple comma-separated values. This is very useful for creating "layers" of backgrounds.padding controls the spacing from the element’s content to its edge.
margin specifies the spacing from the element’s edge to the elements around it.
border allows you to specify a visible border. It’s placed outside the padding.
box-sizing: border-box
px that you can use anywhere a
length is required!. Some useful units are:
% refers to a different thing depending on the property. Look it up on a case-by-case basis!em is relative the current font sizerem is relative to the current font size of the
html elementch represents the width of the "0" glyph in the current font. This is useful in monospaced fonts where every character
has the same width.vw is a percentage of the viewport width (
100vw = viewport width)vh is a percentage of the viewport height (
100vh = viewport height)font-size).calc() to perform calculations between different units.
@keyframes rule.animation property.animation property is actually a shorthand for:
animation-name: Which animation to run?animation-duration: How long should each iteration last?animation-delay: Any delay before it starts?animation-iteration-count: How many times should it play? (number or
infinite)animation-timing-function: How should it progress over time?animation-direction: Should any iterations be reversed?animation-fill-mode: How should it behave before and after it’s applied?animation-play-state: Should it be paused?animationstart,
animationiteration, and
animationend events.display: flex enables Flexbox layout on an element. This element becomes the
Flex Container and its children are called
Flex Items.flex: Nflex-direction: columnalign-items and
justify-content on the flex container specify alignment in each direction. Which direction depends on the value of
flex-direction

$0 always refers to the currently selected element.
$1 to the previously selected element,
$2 to the one before it and so on.element.textContent gives us the content of an element as text. Try changing it!parentNode
childNodes
children
previousSibling
nodeType
				<!DOCTYPE html>
				<html>
				<head>
					<script src="code.js"></script>
				</head>
				<body>
					<script>
						console.log("hi");
					</script>
				</body>
				</html>
2 ways to run JS in your page:
script element. This is the recommended way.script elementscript elements can go anywhere in your HTML, they are not restricted to the
head.let.console.log()
. This is very useful for debugging.[])function(){ /* code */ }. The shortest is the notation shown here (
arrow functions
).map()
method of arrays allows you to transform them into something else.{}). They are similar to dictionaries or maps in other languages.new Object() and the brackets notation for arrays is implicitly calling
new Array().{}). They are similar to dictionaries or maps in other languages.new Object() and the brackets notation for arrays is implicitly calling
new Array().Function
that can also be called (via parentheses).